**注意:**该笔记记录的是 Vue3 + TypeScript 的项目搭建流程
参考链接:
RuoYi(若依开源框架)-前后端分离版-前端流程简单分析
https://github.com/lin-xin/vue-manage-system
https://github.com/Armour/vue-typescript-admin-template
vue-typescript-admin-template项目初始化
1.npm install yarn -g
2.yarn install
3.npm run serve
启动时可能会报错:Error: Cannot find module ‘node_modules\fibers\bin\win32-x64-83\fibers‘ 报错解决方案
初始化项目#
 1
 2
 3
 4
 5
 6
 7
 8
 9
10
11
12
13
14
15
16
17
18
19
20
21
22
23
24
25
|
E:\Projects\OpenGMS-Lab>npm init vue@latest
npm WARN config global `--global`, `--local` are deprecated. Use `--location=global` instead.
Need to install the following packages:
  create-vue@latest
Ok to proceed? (y) y

Vue.js - The Progressive JavaScript Framework

√ Project name: ... lab-ui
√ Add TypeScript? ... No / Yes
√ Add JSX Support? ... No / Yes
√ Add Vue Router for Single Page Application development? ... No / Yes
√ Add Pinia for state management? ... No / Yes
√ Add Vitest for Unit Testing? ... No / Yes
√ Add Cypress for both Unit and End-to-End testing? ... No / Yes
√ Add ESLint for code quality? ... No / Yes
√ Add Prettier for code formatting? ... No / Yes

Scaffolding project in E:\Projects\OpenGMS-Lab\lab-ui...

Done. Now run:

  cd lab-ui
  npm install
  npm run dev
|
可能会遇到的问题:
参考链接:
TypeError: this.cliEngineCtor is not a constructor,webstorm和eslint的版本纠结
项目配置#
ESLint配置#
参考链接:
Vue3+Vite+TS+Eslint(Airbnb规则)搭建生产项目,踩坑详记(一)
1.安装依赖
 1
 2
 3
 4
 5
 6
 7
 8
 9
10
11
12
13
|
npm install eslint --save-dev
npm install --save-dev @typescript-eslint/parser @typescript-eslint/eslint-plugin


# ESLint官方提供的Vue插件,可以检查 .vue文件中的语法错误
npm install eslint-plugin-vue

# 使用eslint插件将prettier作为eslint规则执行
npm install --save-dev eslint-plugin-prettier
npm install --save-dev --save-exact prettier

# 禁用所有与格式相关的eslint规则,也就是说把所有格式相关的校验都交给 prettier 处理
npm install --save-dev eslint-config-prettier
|
2.配置eslint
.eslintrc.js
 1
 2
 3
 4
 5
 6
 7
 8
 9
10
11
12
13
14
15
16
17
18
19
20
|
module.exports = {
  root: true,
  env: {
    node: true
  },
  parserOptions: {
    ecmaVersion: 2020,
    parser: "babel-eslint"
  },
  parser: "@typescript-eslint/parser",
  extends: [
    "plugin:vue/recommended",
    "eslint:recommended",
    "plugin:prettier/recommended" //把所有格式相关的校验都交给 prettier 处理
  ],
  plugins: ["prettier"],
  rules: {
    "prettier/prettier": "error"
  }
};
|
3.配置prettier
有时会遇到 eslint 规则和 prettier 规则冲突的情况。eslint告诉我们要使用单引号,但是改为单引号以后,prettier有告诉我们要使用双引号。
.prettierrc.js
1
2
3
4
|
module.exports = {
  // 无尾逗号
  "trailingComma": "none"
};
|
unplugin-vue-components#
参考链接:
尤大推荐的神器unplugin-vue-components,解放双手!以后再也不用呆呆的手动引入(组件,ui(Element-ui)库,vue hooks等)
1.安装
1
|
npm install unplugin-vue-components -D
|
2.配置 vite.config.ts
 1
 2
 3
 4
 5
 6
 7
 8
 9
10
11
12
13
14
15
16
17
18
19
20
21
22
23
|
import { fileURLToPath, URL } from "node:url";

import { defineConfig } from "vite";
import vue from "@vitejs/plugin-vue";
import vueJsx from "@vitejs/plugin-vue-jsx";
import Components from "unplugin-vue-components/vite";
import { ElementPlusResolver } from "unplugin-vue-components/resolvers";

// https://vitejs.dev/config/
export default defineConfig({
  plugins: [
    vue(),
    vueJsx(),
    Components({
      resolvers: [ElementPlusResolver()]
    })
  ],
  resolve: {
    alias: {
      "@": fileURLToPath(new URL("./src", import.meta.url))
    }
  }
});
|
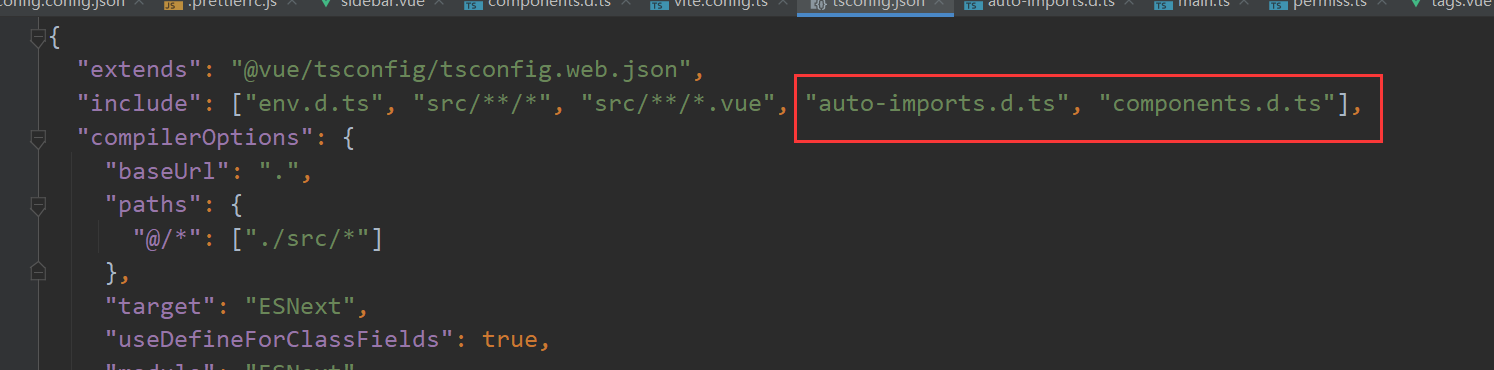
3.插件会生成一个ui库组件以及指令路径components.d.ts文件
4.将生成的文件加入到tsconfig.json中
unplugin-auto-import#
1.安装
1
|
npm i -D unplugin-auto-import
|
2.配置 vite.config.ts
 1
 2
 3
 4
 5
 6
 7
 8
 9
10
11
12
13
|
// vite.config.js
import { defineConfig } from 'vite'
import AutoImport from 'unplugin-auto-import/vite'

export default defineConfig({
  plugins: [
    AutoImport({
      imports: ['vue', 'vue-router', 'vue-i18n', '@vueuse/head', '@vueuse/core'],
      // 可以选择auto-import.d.ts生成的位置,使用ts建议设置为'src/auto-import.d.ts'
      // dts: 'src/auto-import.d.ts'
    })
  ]
})
|
解决ESLint: 'defineStore' is not defined.(no-undef)
unplugin-auto-import的配置和eslint报错解决
vite-plugin-vue-setup-extend#
参考链接:
https://blog.csdn.net/ruisenLi/article/details/124385175
1.安装
1
|
npm i vite-plugin-vue-setup-extend -D
|
2.配置 vite.config.ts
1
2
3
4
5
|
import { defineConfig } from 'vite'
import VueSetupExtend from 'vite-plugin-vue-setup-extend'
export default defineConfig({
  plugins: [ VueSetupExtend() ]
})
|
3.使用
1
2
3
|
<script lang="ts" setup name="demo">

</script>
|
其他配置#
==导入类型检查的时候报错==
TS1444: ‘RouteRecordRaw’ is a type and must be imported using a type-only import when ‘preserveValueImports’ and ‘isolatedModules’ are both enabled.
1
|
import { createRouter, createWebHashHistory, RouteRecordRaw } from "vue-router";
|
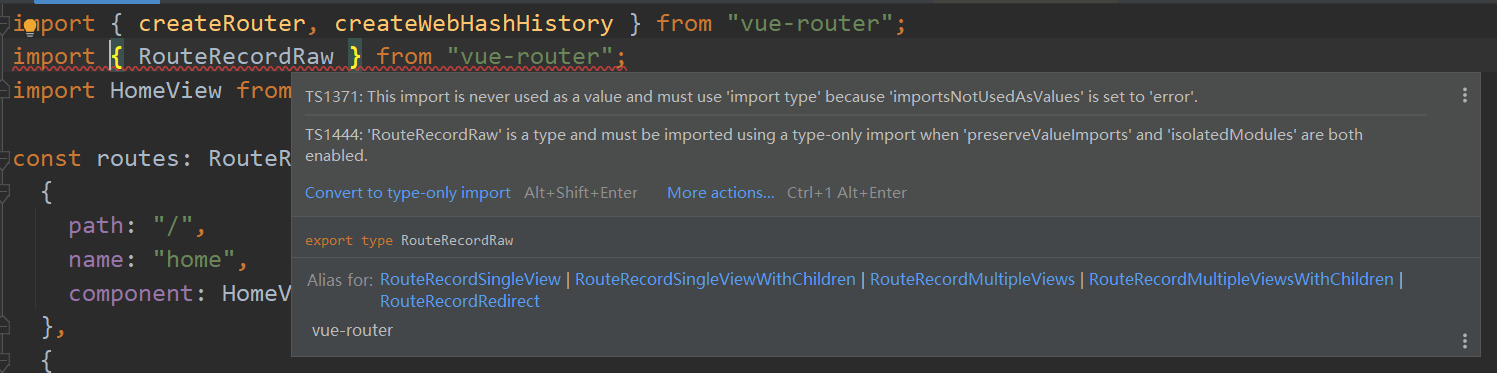
修改为:
1
2
|
import { createRouter, createWebHashHistory } from "vue-router";
import type { RouteRecordRaw } from "vue-router";
|
==ESLint问题及解决方案: Parsing error: Unexpected token==
参考链接:
https://juejin.cn/post/7010688306383945742
添加'parser': '@typescript-eslint/parser',记得需要安装依赖npm install @typescript-eslint/parser --save-dev。
修改后的.eslintrc.js
1
2
3
4
5
|
// .eslintrc.js文件
'parser': '@typescript-eslint/parser',
'parserOptions': {
  'parser': 'babel-eslint',
},
|
==引入自己的组件报错 Cannot find module ‘‘xx’’ or its corresponding type declarations.==
参考链接:
vue + ts中的shims-vue.d.ts文件的作用,在ts中引入vue-echarts等vue文件
在env.d.ts中声明所有的.vue后缀文件
1
2
3
4
5
|
declare module '*.vue' {
  import type { DefineComponent } from 'vue'
  const component: DefineComponent<{}, {}, any>
  export default component
}
|
==ESLint: this.libOptions.parse is not a function==
参考链接:
ESLint: TypeError: this.libOptions.parse is not a function – Code Example
1
|
npm install eslint@8.22.0 --save-exact
|
ElementPlus#
1.安装
1
|
npm install element-plus --save
|
2.全局配置
1
2
3
4
5
6
|
import ElementPlus from 'element-plus'
import zhCn from 'element-plus/es/locale/lang/zh-cn'

app.use(ElementPlus, {
  locale: zhCn,
})
|
pinia#
创建项目时自动安装
router#
创建项目时自动安装
App.vue
1
2
3
4
5
6
7
8
|
<template>
  <router-view />
</template>

<style>
@import './assets/css/main.css';
@import './assets/css/color-dark.css';
</style>
|
router/index.ts
 1
 2
 3
 4
 5
 6
 7
 8
 9
10
11
12
13
14
15
16
17
18
19
20
21
22
23
|
import { createRouter, createWebHistory } from "vue-router";
import HomeView from "../views/HomeView.vue";

const router = createRouter({
  history: createWebHistory(import.meta.env.BASE_URL),
  routes: [
    {
      path: "/",
      name: "home",
      component: HomeView
    },
    {
      path: "/about",
      name: "about",
      // route level code-splitting
      // this generates a separate chunk (About.[hash].js) for this route
      // which is lazy-loaded when the route is visited.
      component: () => import("../views/AboutView.vue")
    }
  ]
});

export default router;
|
element图标#
1.安装element依赖
1
|
npm install @element-plus/icons-vue
|
2.注册所有图标
需要从 @element-plus/icons-vue 中导入所有图标并进行全局注册。
1
2
3
4
5
6
7
8
9
|
// main.ts

// 如果您正在使用CDN引入,请删除下面一行。
import * as ElementPlusIconsVue from '@element-plus/icons-vue'

const app = createApp(App)
for (const [key, component] of Object.entries(ElementPlusIconsVue)) {
  app.component(key, component)
}
|
3.基础用法
 1
 2
 3
 4
 5
 6
 7
 8
 9
10
|
<!-- Use el-icon to provide attributes to SVG icon -->
<template>
  <div>
    <el-icon :size="size" :color="color">
      <Edit />
    </el-icon>
    <!-- Or use it independently without derive attributes from parent -->
    <Edit />
  </div>
</template>
|
自定义图标#
参考链接:
https://blog.csdn.net/weixin_42117267/article/details/112161481
引入在线字体Iconfont(阿里图标库):
https://at.alicdn.com/t/font_830376_qzecyukz0s.css
index.html
 1
 2
 3
 4
 5
 6
 7
 8
 9
10
11
12
13
14
|
<!DOCTYPE html>
<html lang="en">
  <head>
    <meta charset="UTF-8" />
    <link rel="icon" href="/favicon.ico" />
    <meta name="viewport" content="width=device-width, initial-scale=1.0" />
    <title>Vite App</title>
    <link rel="stylesheet" href="https://at.alicdn.com/t/font_830376_qzecyukz0s.css">
  </head>
  <body>
    <div id="app"></div>
    <script type="module" src="/src/main.ts"></script>
  </body>
</html>
|
icon.css
1
2
3
4
|
[class*=" el-icon-lx"],
[class^=el-icon-lx] {
    font-family: lx-iconfont !important;
}
|
SVG图标#
参考链接:
通过vite-plugin-svg-icons 使用SVG图片