参考链接:
https://blog.csdn.net/liuminglei1987/category_10122574.html
从零搭建若依(Ruoyi-Vue)管理系统(10)–Spring Security核心内容梳理
SpringSecurity-从入门到精通
认识SpringSecurity#
Spring Security 是针对Spring项目的安全框架,也是Spring Boot底层安全模块默认的技术选型,他可以实现强大的Web安全控制,对于安全控制,我们仅需要引入 spring-boot-starter-security 模块,进行少量的配置,即可实现强大的安全管理!
记住几个类:
- WebSecurityConfigurerAdapter:自定义Security策略
- AuthenticationManagerBuilder:自定义认证策略
- @EnableWebSecurity:开启WebSecurity模式
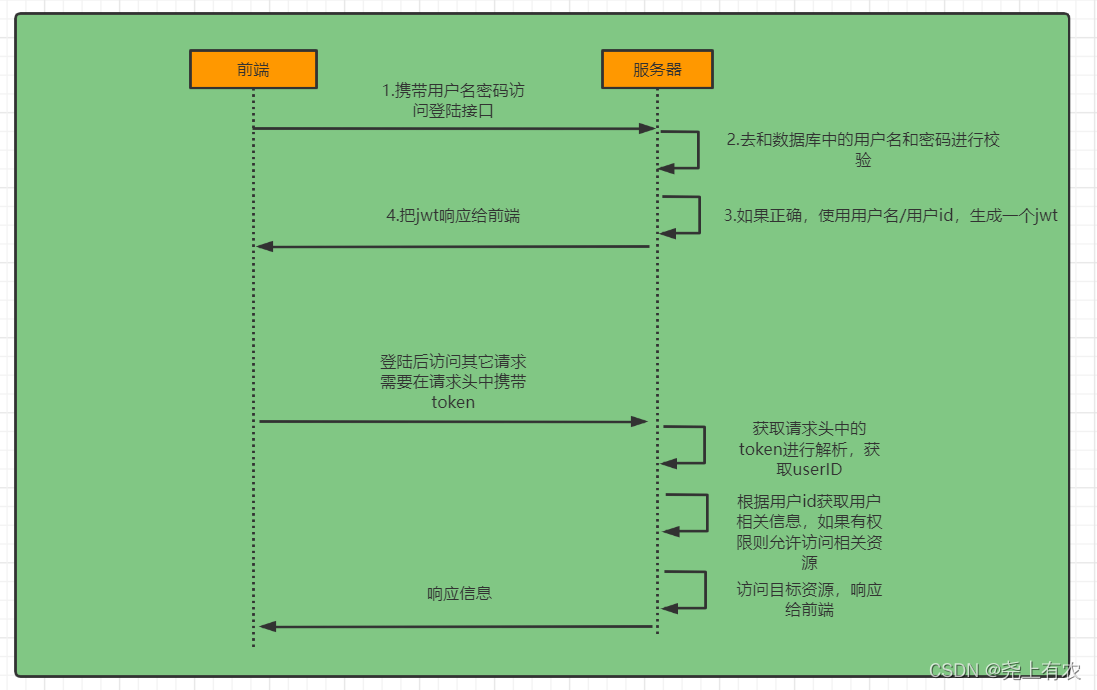
Spring Security的两个主要目标是 “认证” 和 “授权”(访问控制)。
“认证”(Authentication)
身份验证是关于验证您的凭据,如用户名/用户ID和密码,以验证您的身份。
身份验证通常通过用户名和密码完成,有时与身份验证因素结合使用。
“授权” (Authorization)
授权发生在系统成功验证您的身份后,最终会授予您访问资源(如信息,文件,数据库,资金,位置,几乎任何内容)的完全权限。
这个概念是通用的,而不是只在Spring Security 中存在。
Spring Secutity核心内容#
Spring Secutity中的用户信息#
1.UserDetailsService:
该方法很容易理解: 通过用户名来加载用户 。这个方法主要用于从系统数据中查询并加载具体的用户到 Spring Security中。
在开发中我们一般定义一个这个接口的实现类,自定义loadUserByUsername方法,实现从数据源获取用户,加载用户信息。也可以在其中实现一些校验用户逻辑。
1
2
3
4
5
6
|
@Service
public class UserDetailsServiceImpl implements UserDetailsService
{
    @Override
    public UserDetails loadUserByUsername(String username) throws UsernameNotFoundException
    {
|
2.UserDetails:
从上面 UserDetailsService 可以知道最终交给Spring Security的是UserDetails 。该接口是提供用户信息的核心接口。该接口实现仅仅存储用户的信息。后续会将该接口提供的用户信息封装到认证对象Authentication 中去。
UserDetails中默认提供:
- 用户的权限集, 默认需要添加 ROLE_ 前缀
- 用户的加密后的密码, 不加密会使用 {noop} 前缀
- 应用内唯一的用户名
- 账户是否过期
- 账户是否锁定
- 凭证是否过期
- 用户是否可用
在我们自己的项目中,我们要定义个用户类实现该接口,在该用户类中我们可以扩展更多的用户信息,比如手机、邮箱等等
3.UserDetailsServiceAutoConfiguration
关于加密#
任何应用考虑到安全,绝不能明文的方式保存密码到数据库。密码应该通过哈希算法进行加密。
有很多标准的算法比如SHA或者MD5,结合salt(盐)是一个不错的选择。
Spring Security提供BCryptPasswordEncoder类,实现Spring的PasswordEncoder接口使用BCrypt强哈希方法来加密密码。BCrypt强哈希方法 每次加密的结果都不一样既然每次加密结果不一样,就不可以通过相同字符串加密后的结果来判定是不是同一个字符串了,这就更加增强了安全性。
如果需要判断是否是原来的密码,需要用它自带的方法。
加密:
1
2
|
BCryptPasswordEncoder encode = new BCryptPasswordEncoder();
encode.encode(password);
|
判断:
需要通过自带的方法 matches 将未经过加密的密码和已经过加密的密码传进去进行判断,返回布尔值。
1
|
encode.matches(oldpassword,user1.getPassword());
|
Spring Security的配置#
自定义SecurityConfig
首先要继承WebSecurityConfigurerAdapter,其次最常用的是实现configure(AuthenticationManagerBuilder auth)、configure(WebSecurity web)、configure(HttpSecurity http)三个方法实现我们对Spring Security的自定义安全配置。
void configure(AuthenticationManagerBuilder auth) 用来配置认证管理器 AuthenticationManager。void configure(WebSecurity web)用来配置 WebSecurity 。而 WebSecurity是基于Servlet Filter用来配置 springSecurityFilterChain。而 springSecurityFilterChain 又被委托给了 Spring Security 核心过滤器 Bean DelegatingFilterProxy 。 相关逻辑你可以在 WebSecurityConfiguration 中找到。我们一般不会过多来自定义 WebSecurity , 使用较多的使其 ignoring() 方法用来忽略 Spring Security 对静态资源的控制。void configure(HttpSecurity http) 这个是我们使用最多的,用来配置 HttpSecurity 。 HttpSecurity用于构建一个安全过滤器链 SecurityFilterChain。 SecurityFilterChain 最终被注入核心过滤器 。HttpSecurity有许多我们需要的配置。我们可以通过它来进行自定义安全访问策略。
认证流程图#
登陆校验流程#
SpringSecurity完整流程#
SpringSecurity的原理其实就是一个过滤器链,内部包含了提供各种功能的过滤器。这里我们可以看看入门案例中的过滤器。
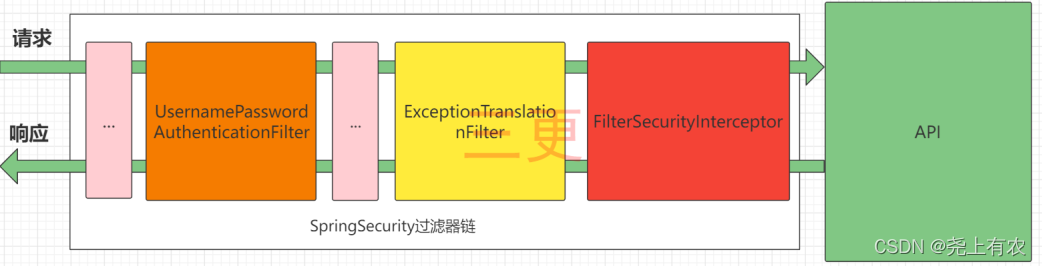
图中只展示了核心过滤器,其它的非核心过滤器并没有在图中展示。
UsernamePasswordAuthenticationFilter:负责处理我们在登陆页面填写了用户名密码后的登陆请求。入门案例的认证工作主要有它负责。
ExceptionTranslationFilter: 处理过滤器链中抛出的任何AccessDeniedException和AuthenticationException 。
FilterSecurityInterceptor: 负责权限校验的过滤器。
认证流程详解#
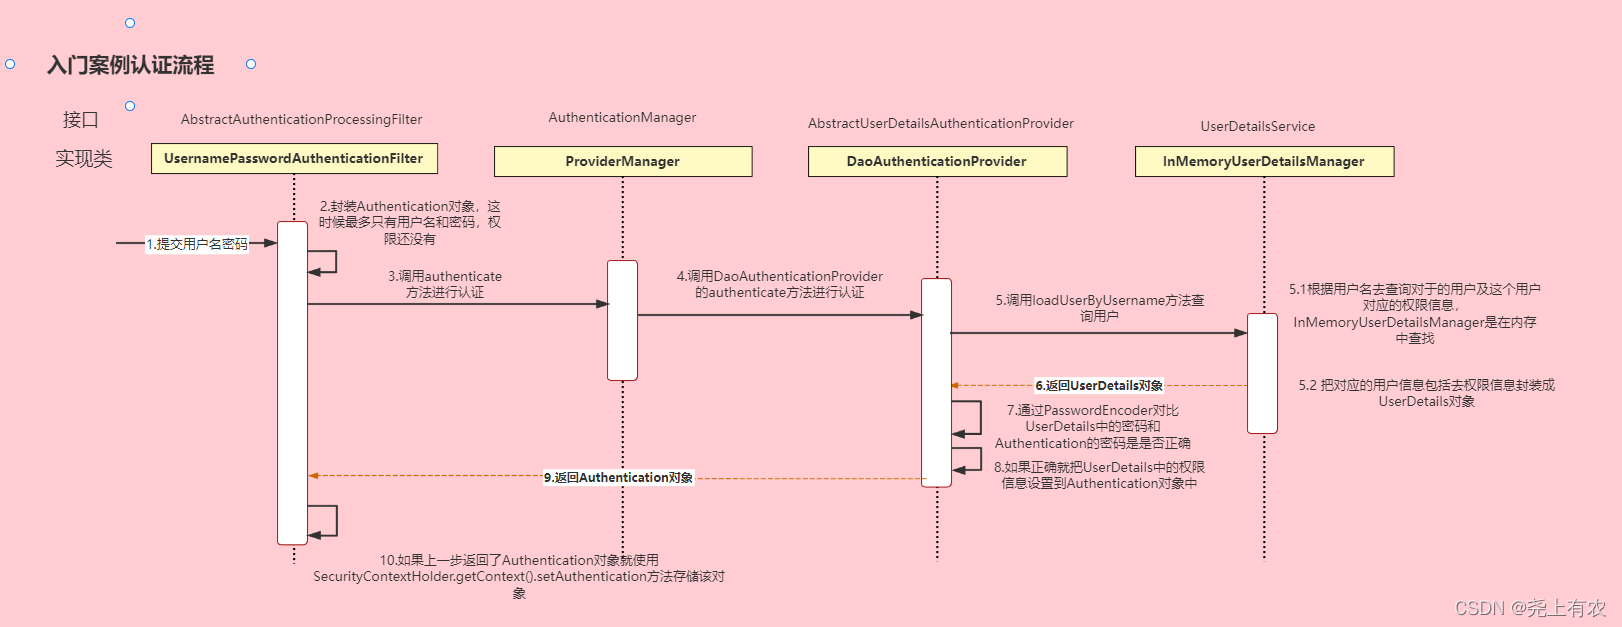
概念速查:
Authentication接口: 它的实现类,表示当前访问系统的用户,封装了用户相关信息。
AuthenticationManager接口:定义了认证Authentication的方法
UserDetailsService接口:加载用户特定数据的核心接口。里面定义了一个根据用户名查询用户信息的方法。
UserDetails接口:提供核心用户信息。通过UserDetailsService根据用户名获取处理的用户信息要封装成UserDetails对象返回。然后将这些信息封装到Authentication对象中。
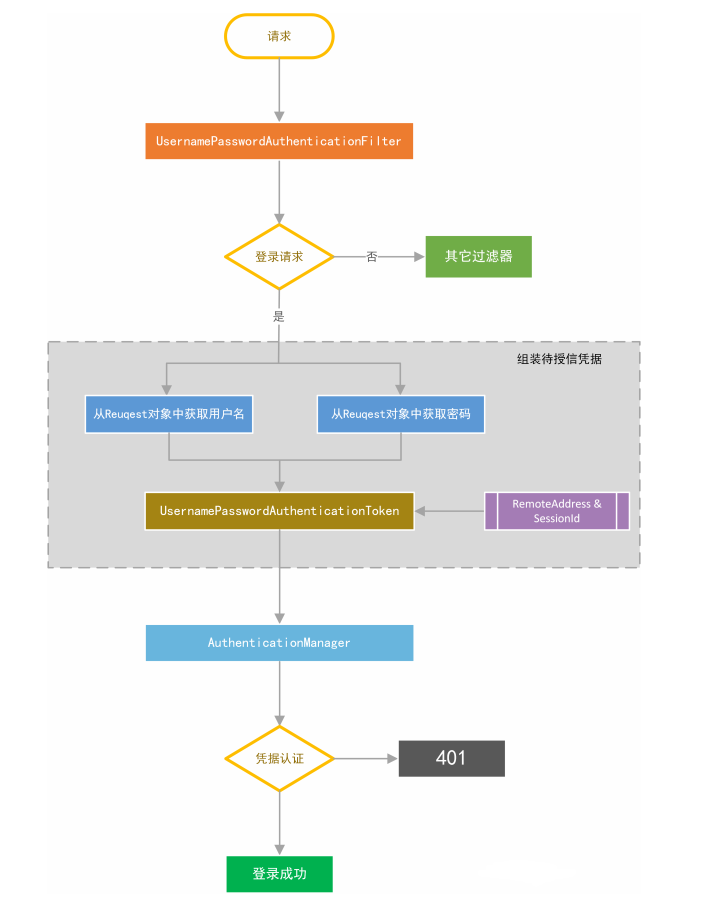
认证过程#
认证过滤器UsernamePasswordAuthenticationFilter:它的作用是拦截登录请求并获取账号和 密码,然后把账号密码封装到认证凭据 UsernamePasswordAuthenticationToken 中,然后把凭据交 给特定配置的 AuthenticationManager去作认证。
权限控制配置#
一、基于配置表达式控制 URL 路径
在继承WebSecurityConfigurerAdapter的配置类中的configure(HttpSecurity http)中进行配置。
例如:
1
2
3
4
5
6
7
8
|
protected void configure(HttpSecurity http) throws Exception {
    http.authorizeRequests()
            .antMatchers("/admin/**").hasRole("admin")
            .antMatchers("/user/**").hasAnyRole("admin", "user")
            .anyRequest().authenticated()
            .and()
            ...
}
|
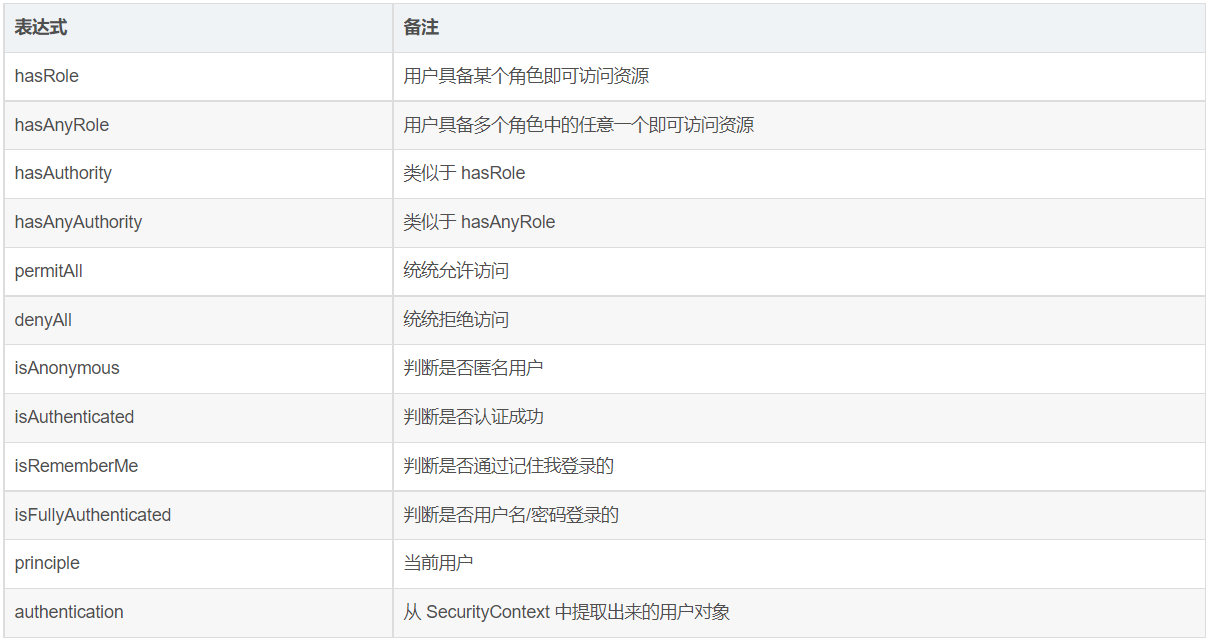
常用的配置可选项:
二、基于注解的接口权限控制
我们可以在任何 @Configuration实例上使用 @EnableGlobalMethodSecurity注解来启用全局方 法安全注解功能
例如:
1
2
3
4
5
6
|
@Configuration
@EnableGlobalMethodSecurity(prePostEnabled = true,securedEnabled = true,jsr250Enabled = true)
public class SecurityConfig extends WebSecurityConfigurerAdapter {
    ...
    ...
}
|
- 设置
prePostEnabled为 true ,则开启了基于表达式 的方法安全控制。
这个配置开启了四个注解,分别是:
@PreAuthorize:在标记的方法调用之前,通过表达式来计算是否可以授权访问。@PostAuthorize:在标记的方法调用之后,通过表达式来计算是否可以授权访问。该注解是针对@PreAuthorize 。区别 在于先执行方法。而后进行表达式判断。如果方法没有返回值实际上等于开放权限控制;如果有返回值 实际的结果是用户操作成功但是得不到响应。@PreFilter:基于方法入参相关的表达式,对入参进行过滤。@PostFilter:和 @PreFilter不同的是, 基于返回值相关的表达式,对返回值进行过滤。分页慎用! 该过程发生接口进行数据返回之前。
-
设置securedEnabled 为 true ,就开启了角色注解@Secured ,该注解功能要简单的多,默认情况下只能基于角色(默认需要带前缀 ROLE_ )集合来进行访问控制决策。
该注解的机制是只要其声明的角色集合(value )中包含当前用户持有的任一角色就可以访问。也就是 用户的角色集合和@Secured注解的角色集合要存在非空的交集。 不支持使用 SpEL表达式进行决策。
-
设置 jsr250Enabled为 true ,就开启了 JavaEE 安全 注解中的以下三个:
@DenyAll 拒绝所有的访问@PermitAll 同意所有的访问@RolesAllowed 用法和@Secured 一样。
==基于注解的权限控制两种实现方式:==
**第一种:**使用spring security自带的注解
@PreAuthorize("hasAnyAuthority('admin','test','system:dept:list')")
hasRole要求有对应的角色才可以访问,但是它内部会把我们传入的参数拼接上 ROLE_ 后再去比较。所以这种情况下要用用户对应的权限也要有 ROLE_ 这个前缀才可以。
第二种:自定义权限校验方法
在@PreAuthorize注解中使用我们的方法
1
2
3
4
5
6
7
|
@PreAuthorize("@ss.hasPermi('system:menu:list')")
@GetMapping("/list")
public AjaxResult list(SysMenu menu)
{
    List<SysMenu> menus = menuService.selectMenuList(menu, getUserId());
    return AjaxResult.success(menus);
}
|
 1
 2
 3
 4
 5
 6
 7
 8
 9
10
11
12
13
14
15
16
17
18
19
|
/**
 * 验证用户是否具备某权限
 *
 * @param permission 权限字符串
 * @return 用户是否具备某权限
 */
public boolean hasPermi(String permission)
{
    if (StringUtils.isEmpty(permission))
    {
        return false;
    }
    LoginUser loginUser = SecurityUtils.getLoginUser();
    if (StringUtils.isNull(loginUser) || CollectionUtils.isEmpty(loginUser.getPermissions()))
    {
        return false;
    }
    return hasPermissions(loginUser.getPermissions(), permission);
}
|
授权基本流程#
在SpringSecurity中,会使用默认的FilterSecurityInterceptor来进行权限校验。在FilterSecurityInterceptor中会从SecurityContextHolder获取其中的Authentication,然后获取其中的权限信息。当前用户是否拥有访问当前资源所需的权限。
所以我们在项目中只需要把当前登录用户的权限信息也存入Authentication。
然后设置我们的资源所需要的权限即可。
 1
 2
 3
 4
 5
 6
 7
 8
 9
10
11
12
13
14
15
16
17
18
19
20
21
22
23
24
25
26
27
28
29
30
31
32
33
34
|
/**
 * 验证用户是否具备某权限
 *
 * @param permission 权限字符串
 * @return 用户是否具备某权限
 */
public boolean hasPermi(String permission)
{
    if (StringUtils.isEmpty(permission))
    {
        return false;
    }
    LoginUser loginUser = SecurityUtils.getLoginUser();
    if (StringUtils.isNull(loginUser) || CollectionUtils.isEmpty(loginUser.getPermissions()))
    {
        return false;
    }
    return hasPermissions(loginUser.getPermissions(), permission);
}

/**
 * 获取用户
 **/
public static LoginUser getLoginUser()
{
    try
    {
        return (LoginUser) getAuthentication().getPrincipal();
    }
    catch (Exception e)
    {
        throw new ServiceException("获取用户信息异常", HttpStatus.UNAUTHORIZED);
    }
}
|
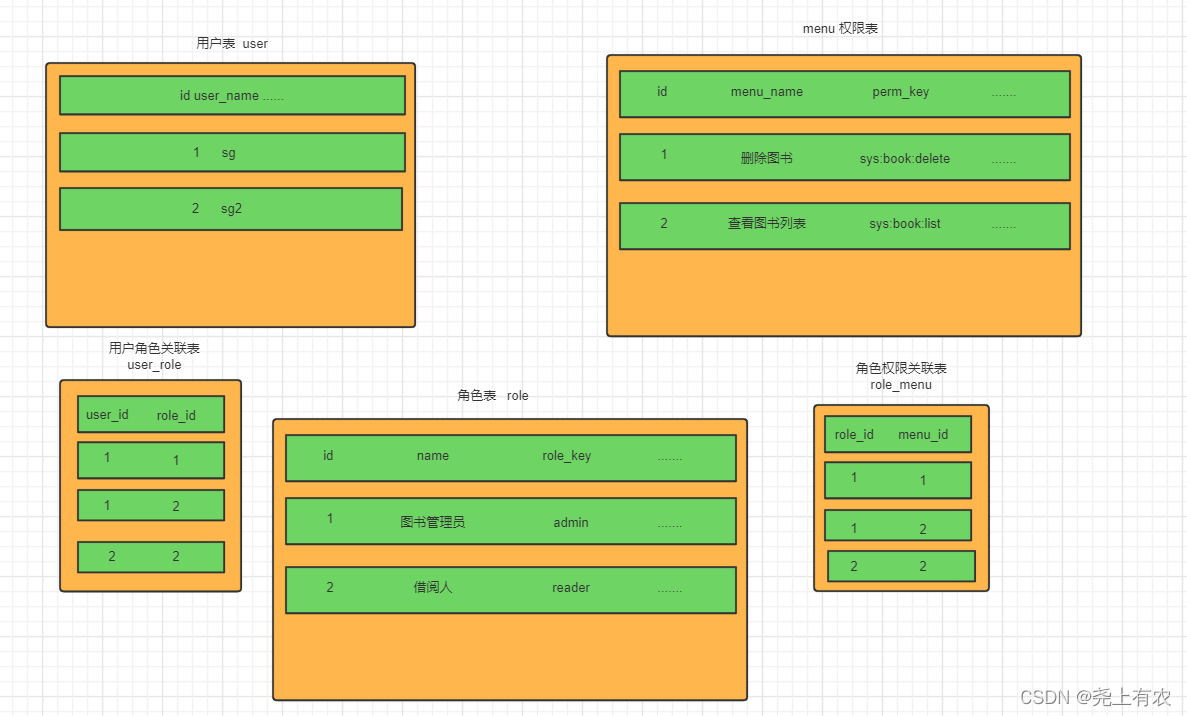
RBAC权限模型#
RBAC权限模型(Role-Based Access Control)即:基于角色的权限控制。这是目前最常被开发者使用也是相对易用、通用权限模型。
参考链接:
Spring Security 中的 hasRole 和 hasAuthority 有区别吗?
登录实现#
1.引入 Spring Security 模块#
1
2
3
4
|
<dependency>
   <groupId>org.springframework.boot</groupId>
   <artifactId>spring-boot-starter-security</artifactId>
</dependency>
|
引入依赖后我们在尝试去访问之前的接口就会自动跳转到一个SpringSecurity的默认登陆页面,默认用户名是user,密码会输出在控制台。 必须登陆之后才能对接口进行访问。
2.编写 Spring Security 配置类#
  1
  2
  3
  4
  5
  6
  7
  8
  9
 10
 11
 12
 13
 14
 15
 16
 17
 18
 19
 20
 21
 22
 23
 24
 25
 26
 27
 28
 29
 30
 31
 32
 33
 34
 35
 36
 37
 38
 39
 40
 41
 42
 43
 44
 45
 46
 47
 48
 49
 50
 51
 52
 53
 54
 55
 56
 57
 58
 59
 60
 61
 62
 63
 64
 65
 66
 67
 68
 69
 70
 71
 72
 73
 74
 75
 76
 77
 78
 79
 80
 81
 82
 83
 84
 85
 86
 87
 88
 89
 90
 91
 92
 93
 94
 95
 96
 97
 98
 99
100
101
102
103
104
105
106
107
108
109
110
111
112
113
114
115
116
117
118
119
120
121
122
123
124
125
126
127
128
129
130
131
132
133
134
135
136
137
138
|
@EnableGlobalMethodSecurity(prePostEnabled = true, securedEnabled = true)
public class SecurityConfig extends WebSecurityConfigurerAdapter
{
    /**
     * 自定义用户认证逻辑
     */
    @Autowired
    private UserDetailsService userDetailsService;

    /**
     * 认证失败处理类
     */
    @Autowired
    private AuthenticationEntryPointImpl unauthorizedHandler;

    /**
     * 退出处理类
     */
    @Autowired
    private LogoutSuccessHandlerImpl logoutSuccessHandler;

    /**
     * token认证过滤器
     */
    @Autowired
    private JwtAuthenticationTokenFilter authenticationTokenFilter;

    /**
     * 跨域过滤器
     */
    @Autowired
    private CorsFilter corsFilter;

    /**
     * 允许匿名访问的地址
     */
    @Autowired
    private PermitAllUrlProperties permitAllUrl;

    /**
     * 解决 无法直接注入 AuthenticationManager
     *
     * @return
     * @throws Exception
     */
    @Bean
    @Override
    public AuthenticationManager authenticationManagerBean() throws Exception
    {
        return super.authenticationManagerBean();
    }

    /**
     * anyRequest          |   匹配所有请求路径
     * access              |   SpringEl表达式结果为true时可以访问
     * anonymous           |   匿名可以访问
     * denyAll             |   用户不能访问
     * fullyAuthenticated  |   用户完全认证可以访问(非remember-me下自动登录)
     * hasAnyAuthority     |   如果有参数,参数表示权限,则其中任何一个权限可以访问
     * hasAnyRole          |   如果有参数,参数表示角色,则其中任何一个角色可以访问
     * hasAuthority        |   如果有参数,参数表示权限,则其权限可以访问
     * hasIpAddress        |   如果有参数,参数表示IP地址,如果用户IP和参数匹配,则可以访问
     * hasRole             |   如果有参数,参数表示角色,则其角色可以访问
     * permitAll           |   用户可以任意访问
     * rememberMe          |   允许通过remember-me登录的用户访问
     * authenticated       |   用户登录后可访问
     */
    @Override
    protected void configure(HttpSecurity httpSecurity) throws Exception
    {
        // 注解标记允许匿名访问的url
        ExpressionUrlAuthorizationConfigurer<HttpSecurity>.ExpressionInterceptUrlRegistry registry = httpSecurity.authorizeRequests();
        permitAllUrl.getUrls().forEach(url -> registry.antMatchers(url).permitAll());

        httpSecurity
                // CSRF禁用,因为不使用session
                // 关闭csrf功能:跨站请求伪造,默认只能通过post方式提交logout请求
                .csrf().disable()
                // 认证失败处理类
                .exceptionHandling().authenticationEntryPoint(unauthorizedHandler).and()
                // 基于token,所以不需要session
                .sessionManagement().sessionCreationPolicy(SessionCreationPolicy.STATELESS).and()
                // 过滤请求
                .authorizeRequests()
                // 对于登录login 注册register 验证码captchaImage 允许匿名访问
                .antMatchers("/login", "/register", "/captchaImage").anonymous()
                // 静态资源,可匿名访问
                .antMatchers(HttpMethod.GET, "/", "/*.html", "/**/*.html", "/**/*.css", "/**/*.js", "/profile/**").permitAll()
                .antMatchers("/swagger-ui.html", "/swagger-resources/**", "/webjars/**", "/*/api-docs", "/druid/**").permitAll()
                // 除上面外的所有请求全部需要鉴权认证
                .anyRequest().authenticated()
                .and()
                .headers().frameOptions().disable();
        // 添加Logout filter
        httpSecurity.logout().logoutUrl("/logout").logoutSuccessHandler(logoutSuccessHandler);
        // 添加JWT filter
        httpSecurity.addFilterBefore(authenticationTokenFilter, UsernamePasswordAuthenticationFilter.class);
        // 添加CORS filter
        httpSecurity.addFilterBefore(corsFilter, JwtAuthenticationTokenFilter.class);
        httpSecurity.addFilterBefore(corsFilter, LogoutFilter.class);

        // 开启自动配置的登录功能
        // http.formLogin()
        //     .loginPage("/toLogin")  //自定义登录页
        //     .loginProcessingUrl("/loginRequest")  // 登陆表单提交的请求
        //     .passwordParameter("password");  // 表单中password需与该处对应。默认是password
        // http.formLogin();

        // 开启自动配置的注销的功能
        // http.logout().logoutSuccessUrl("/"); // 注销成功来到首页

        // 记住我
        // http.rememberMe();
        // http.rememberMe().
        //     rememberMeParameter("remember"); // 定制记住我的参数
    }

    /**
     * 强散列哈希加密实现
     */
    @Bean
    public BCryptPasswordEncoder bCryptPasswordEncoder()
    {
        return new BCryptPasswordEncoder();
    }

    /**
     * 身份认证接口
     */
    @Override
    protected void configure(AuthenticationManagerBuilder auth) throws Exception
    {
        // 数据库验证
        // Spring Security 提供了BCryptPasswordEncoder类,
        // 实现Spring的PasswordEncoder接口使用BCrypt强哈希方法来加密密码
        auth.userDetailsService(userDetailsService).passwordEncoder(bCryptPasswordEncoder());
    }
}
|
3.配置类相关模块#
UserDetailsService 自定义用户认证逻辑
 1
 2
 3
 4
 5
 6
 7
 8
 9
10
11
12
13
14
15
16
17
18
19
20
21
22
23
24
25
26
27
28
29
30
31
32
33
34
35
36
37
38
39
40
41
42
43
44
|
@Service
public class UserDetailsServiceImpl implements UserDetailsService
{
    private static final Logger log = LoggerFactory.getLogger(UserDetailsServiceImpl.class);

    @Autowired
    private ISysUserService userService;

    @Autowired
    private SysPasswordService passwordService;

    @Autowired
    private SysPermissionService permissionService;

    @Override
    public UserDetails loadUserByUsername(String username) throws UsernameNotFoundException
    {
        SysUser user = userService.selectUserByUserName(username);
        if (StringUtils.isNull(user))
        {
            log.info("登录用户:{} 不存在.", username);
            throw new ServiceException("登录用户:" + username + " 不存在");
        }
        else if (UserStatus.DELETED.getCode().equals(user.getDelFlag()))
        {
            log.info("登录用户:{} 已被删除.", username);
            throw new ServiceException("对不起,您的账号:" + username + " 已被删除");
        }
        else if (UserStatus.DISABLE.getCode().equals(user.getStatus()))
        {
            log.info("登录用户:{} 已被停用.", username);
            throw new ServiceException("对不起,您的账号:" + username + " 已停用");
        }

        passwordService.validate(user);

        return createLoginUser(user);
    }

    public UserDetails createLoginUser(SysUser user)
    {
        return new LoginUser(user.getUserId(), user);
    }
}
|
AuthenticationEntryPointImpl 认证失败处理类 返回未授权
 1
 2
 3
 4
 5
 6
 7
 8
 9
10
11
12
13
14
|
@Component
public class AuthenticationEntryPointImpl implements AuthenticationEntryPoint, Serializable
{
    private static final long serialVersionUID = -8970718410437077606L;

    @Override
    public void commence(HttpServletRequest request, HttpServletResponse response, AuthenticationException e)
            throws IOException
    {
        int code = HttpStatus.UNAUTHORIZED;
        String msg = StringUtils.format("请求访问:{},认证失败,无法访问系统资源", request.getRequestURI());
        ServletUtils.renderString(response, JSON.toJSONString(ApiResponse.error(code, msg)));
    }
}
|
LogoutSuccessHandlerImpl 自定义退出处理类 返回成功
 1
 2
 3
 4
 5
 6
 7
 8
 9
10
11
12
13
14
15
16
17
18
19
20
21
22
23
24
25
26
27
28
29
30
31
32
|
@Configuration
public class LogoutSuccessHandlerImpl implements LogoutSuccessHandler
{
    @Autowired
    private TokenService tokenService;


    @Autowired
    private IAsyncService asyncService;


    /**
     * 退出处理
     *
     * @return
     */
    @Override
    public void onLogoutSuccess(HttpServletRequest request, HttpServletResponse response, Authentication authentication)
            throws IOException, ServletException
    {
        LoginUser loginUser = tokenService.getLoginUser(request);
        if (StringUtils.isNotNull(loginUser))
        {
            String userName = loginUser.getUsername();
            // 删除用户缓存记录
            tokenService.delLoginUser(loginUser.getToken());
            // 记录用户退出日志
            asyncService.recordLogininfor(userName, Constants.LOGOUT, "退出成功");
        }
        ServletUtils.renderString(response, JSON.toJSONString(ApiResponse.error(HttpStatus.SUCCESS, "退出成功")));
    }
}
|
JwtAuthenticationTokenFiltertoken token过滤器 验证token有效性
SecurityContextHolder 类最核心的作用,便是将当前给定的 SecurityContext 与 当前执行线程绑定,从而方便后续直接获取。
在SecurityContextHolder中保存的是当前访问者的信息。Spring Security使用一个Authentication对象来表示这个信息。
通过SecurityContextHolder.getContext().setAuthentication(authentication);方式将用户相关的信息存放到系统的安全上下文中,并且由于 SecurityContextHolder默认是mode_threadlocal模式,那么会将所有登录的用户信息都保存,每个登录的用户都可以通过SecurityContextHolder.getContext().getAuthentication();方式获取
当前自己保存的用户信息
 1
 2
 3
 4
 5
 6
 7
 8
 9
10
11
12
13
14
15
16
17
18
19
20
21
22
23
|
@Component
public class JwtAuthenticationTokenFilter extends OncePerRequestFilter
{
    @Autowired
    private TokenService tokenService;

    @Override
    protected void doFilterInternal(HttpServletRequest request, HttpServletResponse response, FilterChain chain)
            throws ServletException, IOException
    {
        LoginUser loginUser = tokenService.getLoginUser(request);
        if (StringUtils.isNotNull(loginUser) && StringUtils.isNull(SecurityUtils.getAuthentication()))
        {
            tokenService.verifyToken(loginUser);
            // 获取权限信息封装到Authentication中
            UsernamePasswordAuthenticationToken authenticationToken = new UsernamePasswordAuthenticationToken(loginUser, null, loginUser.getAuthorities());
            authenticationToken.setDetails(new WebAuthenticationDetailsSource().buildDetails(request));
            // 存入SecurityContextHolder
            SecurityContextHolder.getContext().setAuthentication(authenticationToken);
        }
        chain.doFilter(request, response);
    }
}
|
ResourcesConfig 跨域过滤器
 1
 2
 3
 4
 5
 6
 7
 8
 9
10
11
12
13
14
15
16
17
18
19
20
21
22
23
24
25
26
|
@Configuration
public class ResourcesConfig implements WebMvcConfigurer
{
    /**
     * 跨域配置
     */
    @Bean
    public CorsFilter corsFilter()
    {
        CorsConfiguration config = new CorsConfiguration();
        config.setAllowCredentials(true);
        // 设置访问源地址
        config.addAllowedOriginPattern("*");
        // 设置访问源请求头
        config.addAllowedHeader("*");
        // 设置访问源请求方法
        config.addAllowedMethod("*");
        // 有效期 1800秒
        config.setMaxAge(1800L);
        // 添加映射路径,拦截一切请求
        UrlBasedCorsConfigurationSource source = new UrlBasedCorsConfigurationSource();
        source.registerCorsConfiguration("/**", config);
        // 返回新的CorsFilter
        return new CorsFilter(source);
    }
}
|
PermitAllUrlProperties 设置Anonymous注解允许匿名访问的url
参考链接:
ApplicationContextAware接口的作用
这个接口其实就是获取Spring容器的Bean,在我们写一些框架代码时,或者是看一些框架源码时经常会看到这个接口ApplicationContextAware 的使用,Spring容器会检测容器中的所有Bean,如果发现某个Bean实现了ApplicationContextAware接口,Spring容器会在创建该Bean之后,自动调用该Bean的setApplicationContextAware()方法,调用该方法时,会将容器本身作为参数传给该方法——该方法中的实现部分将Spring传入的参数(容器本身)赋给该类对象的applicationContext实例变量,因此接下来可以通过该applicationContext实例变量来访问容器本身
 1
 2
 3
 4
 5
 6
 7
 8
 9
10
11
12
13
14
15
16
17
18
19
20
21
22
23
24
25
26
27
28
29
30
31
32
33
34
35
36
37
38
39
40
41
42
43
44
45
46
47
48
|
@Configuration
public class PermitAllUrlProperties implements InitializingBean, ApplicationContextAware
{
    private static final Pattern PATTERN = Pattern.compile("\\{(.*?)\\}");

    private ApplicationContext applicationContext;

    private List<String> urls = new ArrayList<>();

    public String ASTERISK = "*";

    @Override
    public void afterPropertiesSet()
    {
        RequestMappingHandlerMapping mapping = applicationContext.getBean(RequestMappingHandlerMapping.class);
        Map<RequestMappingInfo, HandlerMethod> map = mapping.getHandlerMethods();

        map.keySet().forEach(info -> {
            HandlerMethod handlerMethod = map.get(info);

            // 获取方法上边的注解 替代path variable 为 *
            Anonymous method = AnnotationUtils.findAnnotation(handlerMethod.getMethod(), Anonymous.class);
            Optional.ofNullable(method).ifPresent(anonymous -> info.getPatternsCondition().getPatterns()
                    .forEach(url -> urls.add(RegExUtils.replaceAll(url, PATTERN, ASTERISK))));

            // 获取类上边的注解, 替代path variable 为 *
            Anonymous controller = AnnotationUtils.findAnnotation(handlerMethod.getBeanType(), Anonymous.class);
            Optional.ofNullable(controller).ifPresent(anonymous -> info.getPatternsCondition().getPatterns()
                    .forEach(url -> urls.add(RegExUtils.replaceAll(url, PATTERN, ASTERISK))));
        });
    }

    @Override
    public void setApplicationContext(ApplicationContext context) throws BeansException
    {
        this.applicationContext = context;
    }

    public List<String> getUrls()
    {
        return urls;
    }

    public void setUrls(List<String> urls)
    {
        this.urls = urls;
    }
}
|
4.登录模块#
authenticationManager.authenticate 会调用 UserDetailsServiceImpl.loadUserByUsername 进行身份认证
 1
 2
 3
 4
 5
 6
 7
 8
 9
10
11
12
13
14
15
16
17
18
19
20
21
22
23
24
25
26
27
28
29
30
31
32
33
34
35
36
37
38
|
public String login(String username, String password, String code, String uuid) {

        // boolean captchaEnabled = configService.selectCaptchaEnabled();
        // 验证码开关
        if (false)
        {
            // validateCaptcha(username, code, uuid);
        }
        // 用户验证
        Authentication authentication = null;
        try
        {
            UsernamePasswordAuthenticationToken authenticationToken = new UsernamePasswordAuthenticationToken(username, password);
            AuthenticationContextHolder.setContext(authenticationToken);
            // 该方法会去调用UserDetailsServiceImpl.loadUserByUsername
            authentication = authenticationManager.authenticate(authenticationToken);
        }
        catch (Exception e)
        {
            if (e instanceof BadCredentialsException)
            {
                String message = MessageUtils.message("user.password.not.match");
                asyncService.recordLogininfor(username, Constants.LOGIN_FAIL, message);
                throw new ServiceException(message);
            }
            else
            {
                asyncService.recordLogininfor(username, Constants.LOGIN_FAIL, e.getMessage());
                throw new ServiceException(e.getMessage());
            }
        }
        asyncService.recordLogininfor(username, Constants.LOGIN_SUCCESS, MessageUtils.message("user.login.success"));
        LoginUser loginUser = (LoginUser) authentication.getPrincipal();
        recordLoginInfo(loginUser.getUserId());
        // 生成token
        return tokenService.createToken(loginUser);

    }
|
5.登出模块#
SecurityConfig中添加登出过滤链
1
2
|
// 添加Logout filter
httpSecurity.logout().logoutUrl("/logout").logoutSuccessHandler(logoutSuccessHandler);
|
LogoutSuccessHandlerImpl自定义退出处理类 返回成功
 1
 2
 3
 4
 5
 6
 7
 8
 9
10
11
12
13
14
15
16
17
18
19
20
21
22
23
24
25
26
27
28
29
30
31
32
|
@Configuration
public class LogoutSuccessHandlerImpl implements LogoutSuccessHandler
{
    @Autowired
    private TokenService tokenService;


    @Autowired
    private IAsyncService asyncService;


    /**
     * 退出处理
     *
     * @return
     */
    @Override
    public void onLogoutSuccess(HttpServletRequest request, HttpServletResponse response, Authentication authentication)
            throws IOException, ServletException
    {
        LoginUser loginUser = tokenService.getLoginUser(request);
        if (StringUtils.isNotNull(loginUser))
        {
            String userName = loginUser.getUsername();
            // 删除用户缓存记录
            tokenService.delLoginUser(loginUser.getToken());
            // 记录用户退出日志
            asyncService.recordLogininfor(userName, Constants.LOGOUT, "退出成功");
        }
        ServletUtils.renderString(response, JSON.toJSONString(ApiResponse.error(HttpStatus.SUCCESS, "退出成功")));
    }
}
|
6.注册模块#
 1
 2
 3
 4
 5
 6
 7
 8
 9
10
11
12
13
14
15
16
17
18
19
20
21
22
23
24
25
26
27
28
29
30
31
32
33
34
35
36
37
38
39
40
41
42
43
44
45
46
47
48
49
50
51
52
|
public String register(RegisterDTO registerBody) {
    String msg = "", username = registerBody.getUsername(), password = registerBody.getPassword();

    boolean captchaEnabled = configService.selectCaptchaEnabled();
    // 验证码开关
    if (captchaEnabled)
    {
        // validateCaptcha(username, registerBody.getCode(), registerBody.getUuid());
    }

    if (StringUtils.isEmpty(username))
    {
        msg = "用户名不能为空";
    }
    else if (StringUtils.isEmpty(password))
    {
        msg = "用户密码不能为空";
    }
    else if (username.length() < UserConstants.USERNAME_MIN_LENGTH
        || username.length() > UserConstants.USERNAME_MAX_LENGTH)
    {
        msg = "账户长度必须在2到20个字符之间";
    }
    else if (password.length() < UserConstants.PASSWORD_MIN_LENGTH
        || password.length() > UserConstants.PASSWORD_MAX_LENGTH)
    {
        msg = "密码长度必须在5到20个字符之间";
    }
    else if (UserConstants.NOT_UNIQUE.equals(userService.checkUserNameUnique(username)))
    {
        msg = "保存用户'" + username + "'失败,注册账号已存在";
    }
    else
    {
        SysUser sysUser = new SysUser();
        sysUser.setUserName(username);
        sysUser.setPassword(SecurityUtils.encryptPassword(registerBody.getPassword()));
        boolean regFlag = userService.registerUser(sysUser);
        if (!regFlag)
        {
            msg = "注册失败,请联系系统管理人员";
        }
        else
        {
            asyncService.recordLogininfor(username, Constants.REGISTER,
                MessageUtils.message("user.register.success"));
        }
    }
    return msg;


}
|
授权实现#
1.创建数据库表#
 1
 2
 3
 4
 5
 6
 7
 8
 9
10
11
12
13
14
15
16
17
18
19
20
21
22
23
24
25
26
27
28
29
30
31
32
33
34
35
36
37
38
39
40
41
42
43
44
45
46
47
48
49
50
51
52
53
54
55
56
57
58
59
60
61
62
63
64
65
66
67
68
69
|
-- ----------------------------
-- 角色信息表
-- ----------------------------
drop table if exists sys_role;
create table sys_role (
  role_id              bigint(20)      not null auto_increment    comment '角色ID',
  role_name            varchar(30)     not null                   comment '角色名称',
  role_key             varchar(100)    not null                   comment '角色权限字符串',
  role_sort            int(4)          not null                   comment '显示顺序',
  data_scope           char(1)         default '1'                comment '数据范围(1:全部数据权限 2:自定数据权限 3:本部门数据权限 4:本部门及以下数据权限)',
  menu_check_strictly  tinyint(1)      default 1                  comment '菜单树选择项是否关联显示',
  dept_check_strictly  tinyint(1)      default 1                  comment '部门树选择项是否关联显示',
  status               char(1)         not null                   comment '角色状态(0正常 1停用)',
  del_flag             char(1)         default '0'                comment '删除标志(0代表存在 2代表删除)',
  create_by            varchar(64)     default ''                 comment '创建者',
  create_time          datetime                                   comment '创建时间',
  update_by            varchar(64)     default ''                 comment '更新者',
  update_time          datetime                                   comment '更新时间',
  remark               varchar(500)    default null               comment '备注',
  primary key (role_id)
) engine=innodb auto_increment=100 comment = '角色信息表';

-- ----------------------------
-- 菜单权限表
-- ----------------------------
drop table if exists sys_menu;
create table sys_menu (
  menu_id           bigint(20)      not null auto_increment    comment '菜单ID',
  menu_name         varchar(50)     not null                   comment '菜单名称',
  parent_id         bigint(20)      default 0                  comment '父菜单ID',
  order_num         int(4)          default 0                  comment '显示顺序',
  path              varchar(200)    default ''                 comment '路由地址',
  component         varchar(255)    default null               comment '组件路径',
  query             varchar(255)    default null               comment '路由参数',
  is_frame          int(1)          default 1                  comment '是否为外链(0是 1否)',
  is_cache          int(1)          default 0                  comment '是否缓存(0缓存 1不缓存)',
  menu_type         char(1)         default ''                 comment '菜单类型(M目录 C菜单 F按钮)',
  visible           char(1)         default 0                  comment '菜单状态(0显示 1隐藏)',
  status            char(1)         default 0                  comment '菜单状态(0正常 1停用)',
  perms             varchar(100)    default null               comment '权限标识',
  icon              varchar(100)    default '#'                comment '菜单图标',
  create_by         varchar(64)     default ''                 comment '创建者',
  create_time       datetime                                   comment '创建时间',
  update_by         varchar(64)     default ''                 comment '更新者',
  update_time       datetime                                   comment '更新时间',
  remark            varchar(500)    default ''                 comment '备注',
  primary key (menu_id)
) engine=innodb auto_increment=2000 comment = '菜单权限表';

-- ----------------------------
-- 角色和菜单关联表  角色1-N菜单
-- ----------------------------
drop table if exists sys_role_menu;
create table sys_role_menu (
  role_id   bigint(20) not null comment '角色ID',
  menu_id   bigint(20) not null comment '菜单ID',
  primary key(role_id, menu_id)
) engine=innodb comment = '角色和菜单关联表';


-- ----------------------------
-- 用户和角色关联表  用户N-1角色
-- ----------------------------
drop table if exists sys_user_role;
create table sys_user_role (
  user_id   bigint(20) not null comment '用户ID',
  role_id   bigint(20) not null comment '角色ID',
  primary key(user_id, role_id)
) engine=innodb comment = '用户和角色关联表';
|
2.权限过滤器#
 1
 2
 3
 4
 5
 6
 7
 8
 9
10
11
12
13
14
15
16
17
18
19
20
21
22
23
|
@Component
public class JwtAuthenticationTokenFilter extends OncePerRequestFilter
{
    @Autowired
    private TokenService tokenService;

    @Override
    protected void doFilterInternal(HttpServletRequest request, HttpServletResponse response, FilterChain chain)
            throws ServletException, IOException
    {
        LoginUser loginUser = tokenService.getLoginUser(request);
        if (StringUtils.isNotNull(loginUser) && StringUtils.isNull(SecurityUtils.getAuthentication()))
        {
            tokenService.verifyToken(loginUser);
            // 获取权限信息封装到Authentication中
            UsernamePasswordAuthenticationToken authenticationToken = new UsernamePasswordAuthenticationToken(loginUser, null, loginUser.getAuthorities());
            authenticationToken.setDetails(new WebAuthenticationDetailsSource().buildDetails(request));
            // 存入SecurityContextHolder
            SecurityContextHolder.getContext().setAuthentication(authenticationToken);
        }
        chain.doFilter(request, response);
    }
}
|
3.登录时权限赋值#
在 UserDetailsServiceImpl 的 loadUserByUsername 中为user赋上权限

4.权限查询Mapper#
 1
 2
 3
 4
 5
 6
 7
 8
 9
10
11
12
13
14
15
16
17
18
|
<select id="selectMenuListByUserId" parameterType="SysMenu" resultMap="SysMenuResult">
   select distinct m.menu_id, m.parent_id, m.menu_name, m.path, m.component, m.`query`, m.visible, m.status, ifnull(m.perms,'') as perms, m.is_frame, m.is_cache, m.menu_type, m.icon, m.order_num, m.create_time
   from sys_menu m
   left join sys_role_menu rm on m.menu_id = rm.menu_id
   left join sys_user_role ur on rm.role_id = ur.role_id
   left join sys_role ro on ur.role_id = ro.role_id
   where ur.user_id = #{params.userId}
   <if test="menuName != null and menuName != ''">
           AND m.menu_name like concat('%', #{menuName}, '%')
   </if>
   <if test="visible != null and visible != ''">
           AND m.visible = #{visible}
   </if>
   <if test="status != null and status != ''">
           AND m.status = #{status}
   </if>
   order by m.parent_id, m.order_num
</select>
|
5.自定义权限方法#
 1
 2
 3
 4
 5
 6
 7
 8
 9
10
11
12
13
14
15
16
17
18
19
20
21
22
23
24
25
26
27
28
29
30
31
32
33
|
@Service("ss")
public class PermissionService
{
    /** 所有权限标识 */
    private static final String ALL_PERMISSION = "*:*:*";

    /** 管理员角色权限标识 */
    private static final String SUPER_ADMIN = "admin";

    private static final String ROLE_DELIMETER = ",";

    private static final String PERMISSION_DELIMETER = ",";

    /**
     * 验证用户是否具备某权限
     *
     * @param permission 权限字符串
     * @return 用户是否具备某权限
     */
    public boolean hasPermi(String permission)
    {
        if (StringUtils.isEmpty(permission))
        {
            return false;
        }
        LoginUser loginUser = SecurityUtils.getLoginUser();
        if (StringUtils.isNull(loginUser) || CollectionUtils.isEmpty(loginUser.getPermissions()))
        {
            return false;
        }
        return hasPermissions(loginUser.getPermissions(), permission);
    }
}
|
6.接口实现#
 1
 2
 3
 4
 5
 6
 7
 8
 9
10
|
/**
 * 获取菜单列表
 */
@PreAuthorize("@ss.hasPermi('system:menu:list')")
@GetMapping("/list")
public AjaxResult list(SysMenu menu)
{
    List<SysMenu> menus = menuService.selectMenuList(menu, getUserId());
    return AjaxResult.success(menus);
}
|